We're back with the second part of our armoury series for epeeists. In the focus today: how to glue your blade. As last week, all tips and tricks shared here are based on the experience of our Instagram girl Johanna, who prefers to have all her epees equipped with our ultra light titanium tip (if even Bas Verwijlen does, who can blame her? ;) ) and therefore regularly rewires her blades.
How to glue your epee blade
Hello again, fencers. After
last week's crash course about how to prepare your weapon for rewiring (and my confession why I usually rewire every new blade I buy), here we are now: Your blade has been degreased, any old wires and glue residues removed – this means your blade is ready to be rewired. Here’s the steps to follow:
1. Check the width of the groove at the tip end of the blade
This step is preliminary and won’t be required in all cases, but it can save you from ruining a
wire and you know what they say: better safe than sorry ;)
Have a look at the groove of your
blade and make sure that at the tip end it's wide enough to contain the new wire. In fact, the width of the groove can vary by fractions of millimetres depending on the manufacturer and so can the diameter of the wire and its insulation. If, like me, you rewire a
Leon Paul blade using a Leon Paul wire then you won’t have any issues because they’re made for each other. If you use a
Leon Paul wire on a blade featuring a very narrow groove (relatively common on blades manufactured in Eastern Europe), you might get into trouble because there might not be enough room in the groove to properly contain the wire. In this case, you risk damaging the insulation in the rewiring process and then it’s hello short-circuit as soon as you’ll try to fence electrically… which means that you’ll have to start the whole rewiring process
from zero again (including removing glue residues!) . So, if you’re in doubt, better grab a file and widen the groove a bit, making sure that there are no sharp edges.
2. Get your wire straight
Now it’s time to focus your attention on the protagonist giving the name to our whole operation: the
wire itself. Carefully unwrap it, removing any twists and kinks it may have.
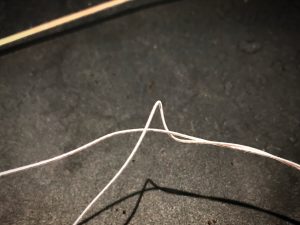 No kinks like these in the wire, please ;) (Picture © Leon Paul)
Oh, and when I say careful I mean it: especially if you have long and sharp fingernails you should be extra-cautious, or you’ll risk damaging the insulation and the result will be the same as above. Your weapon will show a short circuit as soon as it’s connected to an electric tester/scoring machine and you’ll have to restart the whole process again.
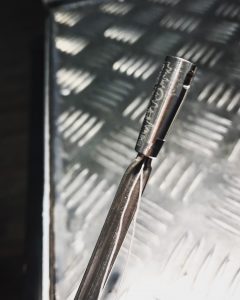
3. Put the wire on your barrel
Then take your
barrel (you won’t need the other point components until you’re completely finished with the gluing process) and insert the “empty” end of the wire, that is the end where there’s no contact cap, through the wider end of the barrel and gently push it through until the wire comes out on the other narrower end of the barrel. Grab the “empty” end and pull almost the whole wire through the barrel until the contact cap is at about one or two inches from the barrel.
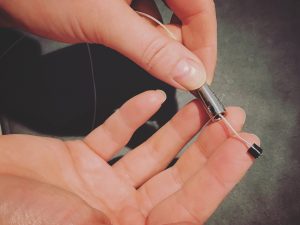 Inserting the wire into the barrel (Picture © Leon Paul)
Set up your blade in a vice (if you have one, otherwise I’d recommend you hold it in place with your knees or ask a fellow fencer for help) and with the wire placed into the groove, start screwing the barrel to you blade. Do not tighten it completely for the moment! It is supposed to be loose at this point; just not so loose that it can fall off. Double-check that the wire lies in the groove “comfortably”, that is able to move back and forth freely. If that’s not the case you might to widen the groove, as described in step one. Once you’re sure that your wire is correctly put in place, you’ll need to set the contact cap by slowly and gently pushing it into the bottom of the barrel while very gently pulling from the other side. If you have one, use an
epee wire applicator (a specifically shaped plastic rod for pushing the brass contacts of the epee wire into the barrel) for this step; otherwise your
point screwdriver might do the job (in this case, just pay extra attention that the contact cap sits in the barrel without leaning to one side or the other.)
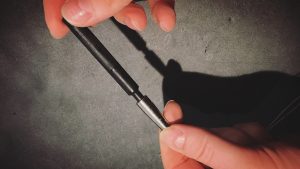 The applicator at work ;) (Picture © Leon Paul)
Once you’re sure that the brass contacts are correctly set in place, grab your
6mm spanner and while still keeping an eye on your wire so that it won’t get caught in the thread, finish screwing the barrel to your blade until it sits completely tight. Now the most difficult part of the rewiring is done and you’re almost set for the actual gluing process. Just a small, yet essential step before that…
 (Almost) ready for the actual gluing (Picture © Leon Paul)
4. Prepare for gluing
Take your wire or actually the two wires (on a
brand new Leon Paul wire, these will still be connected at the end, unless you have cut them) and place them in the blade groove, making sure to keep them parallel. The wires shouldn’t be intertwined. If, over the whole length of the blade they switch position once or even twice, it’s not the end of the world, but it is nicer to look at if they don’t cross at all ;) . Once all is correctly in place, wrap the end of the wire(s) around the blade tang with just enough tension to keep the wire straight.
Then you should bend your blade to prevent the wire from snapping when you fence. There are several ways to do this: some people will use a metallic chain cut down to the right length with clamps at the end, some will trap the blade between the floor and the radiator (if it’s the right height)… and some people, myself included, prefer shoelaces. Just fix it at the tip of your blade (if your shoe laces are narrow enough you can even stick them through the wholes for the point screws and make a knot!), bend your weapon on the floor to more or less the angle it would bend if you lunged with medium to full power against a non-moving object like a wall and then fix the other end of your shoelace around the tang, while maintaining the bend. The final result will look more or less like a bow you’d use for archery, with your blade being the actual bow and your shoelace the bowstring.
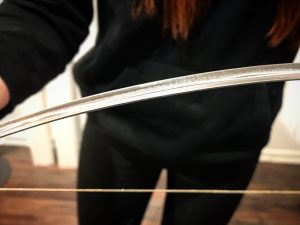 The fencing arrow ;) (Picture © Leon Paul)
Attention: you want to make absolutely sure that neither your shoelaces nor your knots won’t give in during the gluing process! Released from the tension brought about by the shoelace, the blade will snap back into its natural straight position with full force and if you, anybody else, or just a fragile object are in the way when this happens, things won’t be fun at all. So be extra scrupulous when tightening your nods (always better to make more than you’d need!) and generally be extremely careful when you bend your blade. I always make sure that there are no other people around me, and try to stay clear of furniture, fencing bags and generally speaking “objects in the way”.
(I even have a confession to make: the first times when I rewired my blade I might have been seen bending it in the middle of fencing hall after practice, while everybody else was in the changing rooms with a fencing mask on my head to protect me against incidental blade snapping… ;) You don’t necessarily have to go these lengths, but always be safe!)
5. Glue
Now you’re ready for gluing: If necessary, prepare your glue (if you use an epoxy or resin glue like we do in the Leon Paul factory, you'll have to mix the two components); then apply it from directly below the tip until the forte of the blade, keeping an eye on using just the right amount of glue to coat the wire, but not the whole blade. Your motto should be: as much as necessary, as little as possible. At any rate, don't apply glue onto the last 1/4 inch before the tang, as that's where the PVC wire sleeving (see step 6) will go. If need be, use a
blade jig which you can
clip to the forte to hold the wire in place during the operation. From my personal experience I can say that this small accessory is particularly helpful with the
Leon Paul V-shaped blades.
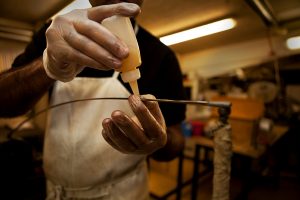 We couldn't keep this picture of a true pro at work from you:
a blade being glued in our London factory by our employee Chulinal
(Picture © Leon Paul)
We couldn't keep this picture of a true pro at work from you:
a blade being glued in our London factory by our employee Chulinal
(Picture © Leon Paul)
Put your weapon aside to dry - how much time this will take will depend on the type of glue used. With superglue or our
Instant blademate you're good to go after under an hour, but glues that are less at risk of getting brittle, such as Bostik or
our Epoxy glue, may take up to 24 hours. When in doubt, just check the glue packaging; you should find instructions there.
6. Install the PVC wire sleeving
Once the glue is completely dry, take the shoelaces off your blade and, if applicable, cut the wire in two. (As I said before, on a
Leon Paul wire this step will be necessary). Then insert each end into a PVC sleeve, which you'll previously have cut to a length of about 5 inches. The PVC sleeve should reach about 1/4 of an inch into the forte of the blade (yes, the same 1/4 of an inch that you didn't glue before!)
Then you just need to assemble the point - and your blade is ready to be mounted to a weapon, just as a
brand new wired blade.