It’s probably the task most fencers secretly (or even not so secretly) fear: rewiring a blade. But no matter whether it’s because the wiring of your favourite blade is damaged, you want to use a different kind of tip than the one your blade came with or you simply bought an unwired blade – there are moments in a fencer’s life when you just have to face that task and get it done. We’ve put together some useful tips for rewiring your epee. Brought to you by our Instagram girl Johanna, who regularly rewires her weapons by herself. Today’s post will focus on how to best prepare your blade for the actual rewiring.
Hello again, fencers.
After coming clean about my sweet spot for shoes, I have yet another fencing-related confession to make: I am an absolute sucker for our
titanium epee tip, since I first tested it a few years ago out of mere curiosity (and ok, I admit it, because I liked the
detailing of the London skyline on the barrel so much). It was love at first
sight hit, so to speak, because all of a sudden my tip felt magically transformed: More than once, I had the impression that my epee was making the hits all by itself (when I re-read the
product description closely; I found out that there was no magic behind it, just the general laws of physics: a tip that is almost two times lighter than a traditional tip – for the Leon Paul titanium point it’s just 2.3g, as compared to 4.4g for a standard point barrel – will inevitably move a lot faster, since there’s less inertia. Which means that it’ll go faster to where you want it to be). Either way, I was hooked, and couldn’t really imagine my (fencing) life without that special accessory anymore.
However, there is a small obstacle to my happiness: Unless I go directly for our
Fusion Pro FIE blade, which at the time I discovered the titanium tip was not yet on the market, Leon Paul’s
wired blades will come with the
standard tip, meaning that I either have to exchange the tip or buy an
unwired blade. In both cases, the resulting task for me is the same: I need to do the
(re)wiring myself. (No question of outsourcing this to my coach or a fellow fencer! My kit is my kit and I like to have control over even the slightest detail. ) So, over time I’ve acquired a bit of practice in rewiring epee blades and thought I’d share some of my findings with you. Of course, there’s always an element of subjectivity. I won’t say this is the only way to wire your blade (on the contrary, if you talk to four people, you’ll probably get five different versions of how to do it), but I hope you’ll find some useful tips in here.
Today I’ll first focus on a step that at first glance may look not worth bothering too much about, but which is actually crucial to the success of your rewiring mission (and your fencing after). And that's cleaning your blade properly.
How to clean your blade and prepare it for (re-)wiring
Your blade has to be absolutely clean, or otherwise the glue might not bond well, meaning you’ll have to face the lovely task of rewiring your blade again very soon. So you really shouldn’t be lazy on that step. How time-consuming this task is actually going to be, will vary depending on the past life of your fencing blade, that is whether it has been wired before or not .
Case 1: ‘naked’ blade (= a blade that has never been wired before)
If you bought your blade brand new in an
unwired version, you’re in luck: wiping grease and oil residues off with a clean cloth and a chemical cleaning product such as degreaser or acetone will do the trick and you’re ready for the next step.
Case 2: previously wired blade (with tips to remove the Leon Paul epoxy glue!)
It’s when you need to replace a pre-existent wire that things get a little messy and usually a lot more time-consuming. In this case, you’ll first have to get rid of the old wire – which is usually the easiest part - and then remove all those nasty (and sadly very often tenacious) residues of glue. But first things first.
Removing the old wire
To remove an old epee wire, what I’ve found to work best for wired
Leon Paul blades, is just grabbing the wire where it meets the tang (you can use pliers to do that, but I admit, I usually use my bare hands) and then pulling it off quite firmly. If the wire won’t come off right away because the glue adheres a little bit too well, heating the blade a bit, for instance with an hairdryer set on full power, should help. If you’re a pro and have that kind of equipment – I don’t, to be honest – you can also use a heat gun, or a gas powered torch on very low power (see also the section about getting rid of glue residue below) In both cases, just be careful to not burn your fingers. Pull, pull, pull until you’re just about to arrive to the spot where your wire enters the barrel, then stop before the wire breaks (it’s not the end of the world if it does, but the next steps will be a bit easier if it doesn’t). At the latest at this point, you should also unscrew your tip, and remove the
pressure spring,
tip screws and the
point tip itself.
One word of advice: Watch these tiny objects closely, if they manage to escape, you’ll probably have lost them forever. I usually use a magnetic
screwdriver to prevent that from happening. (And I don’t want to state the obvious, but you can make pretty much any screwdriver magnetic by rubbing it against a naturally magnetic object. The rare earth magnet coming with the
Leon Paul MagneTin III box is perfect for that).
Then, set up the blade in a vice, making sure that the point is not too far from the vice - less than 5cm/2 inches will be more than fine. With a
6mm spanner, unscrew the tip barrel and remove it. Most likely, your old wire will still be stuck in the barrel and it’s at this point that it’ll come in handy if the wire didn’t break before since that will give you the possibility to lift off that bit of the wire still glued to the blade by gently pulling from both sides. Once you’ve successfully removed the barrel, push the old wire out of it with a very thin object…and by thin I mean REALLY thin. Even your point screwdriver might be too big! I personally have found the non-pointy end of a bigger sewing needle to work best.
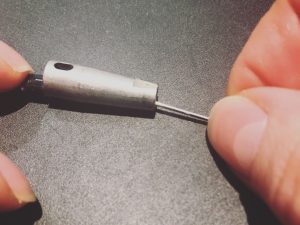 Removing an old wire from an epee barrel (Picture © Leon Paul)
Getting rid of glue residue
Then focus your attention on the blade… and the lion’s share of the work that awaits you. Do you see all those tiny spots of glue? These are the enemy of your epee blade, fencers and need to be eliminated, or else you’ll risk not only that the “new” glue won’t adhere properly but also that you get a non-wanted hit. Glue drops can insulate the blade to the point that your opponent’s light comes on if they manage to hit you exactly there. Granted, your opponent would either need to be very skilled or very lucky to achieve that, but it’s still better to provide for this not happening at all, isn’t it?.
 Get rid off those glue spots (Picture © Leon Paul)
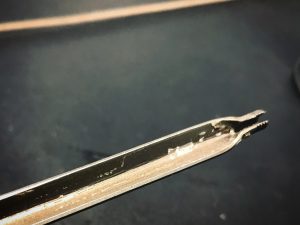
The best method
The best way of removing any residue will
depend on the type of glue used. On blades wired with cyanoacrylate-based glue (type superglue; the relatively popular Bostik all purpose glue and our
blademate instant adhesive also fall into this category), you’ll be perfectly fine with acetone. Just drip it onto the blade as you go along and scrape the glue off. Some fencers and armourers I know even have a copper pipe filled with acetone where the old blades will take a bath until the glue has dissolved.
 A copper pipe filled with acetone is an excellent solution to take off cyanoacrylate-based glue (Picture © Leon Paul)
Beware though: on a
Leon Paul wired blade, where you’ll find a
two component resin (or epoxy) glue that has the amazing property of being extremely long-lasting while always staying flexible, this method won’t work at all. In the best case, nothing will happen; in the worst case you’ll end up with a big “sticky mess that is a nightmare to properly remove.“ (Those are the words of our director Alex Paul, who is the technical and technological mastermind behind Leon Paul products, so you better believe him).
In this case, you’re remaining two options are either heat or mechanical scraping.
If you are among the lucky ones to own a heat gun or a gas powered torch (if you or someone in your family is fond of cooking, it might be worth checking your kitchen for that, since it’s basically the item you’d use for making
crème brulée), then you can just heat the blade in small sections, work your way from one end to the other and scrape/rub off the glue residues as you go along. Since, if you own a heat pistol, you’ll probably have used it when you removed your wire, it is likely that you won’t have much cleaning left to do anyway: resin melts as it warms up, and therefore most of the glue will already have come off.
If like me, you don’t own a heat gun and/or don’t like to work with open flames, any chisel-like object is your best friend. This can be an old hacksaw blade, a knife, a fine point awl, a screwdriver, sandpaper or – and that would be my pick. If you don’t want to rely on your muscles alone ;) – a rotary tool type Dremel with various bits. Just make sure the carving and polishing tools you use are the right size for your blade and start scraping, giving particular attention to the groove and the forte of the blade.
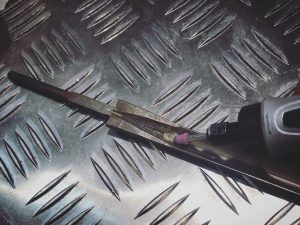 A rotary tool is my personal favourite to get rid off glue residues (Picture © Leon Paul)
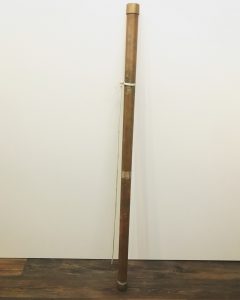
Afterwards, proceed to degreasing as you would do with a 'naked' blade. The whole process might take some time (up to half an hour if you’re doing it the very first time), but you’ll be rewarded with a blade that’s (almost) as shiny as a mirror and ready for the actual rewiring…
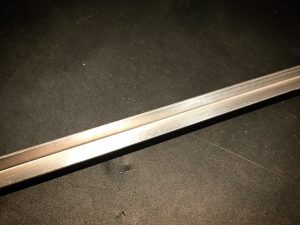 All shiny and ready to be rewired :) (Picture © Leon Paul)
See you again next week with instructions about how to do that!